Print Order Desk User Guide
This brief guide is designed to help you understand the process of registering as a user, and then placing your orders for print jobs, including business cards, flyers, and brochures, as well as posters, banners, and other larger items from our Wide Format area.
If you are using an assistive device and the written instructions are not adequate to help you navigate, please call us for assistance! 513-556-5043
Table of Contents
Home Page
Once your account has been activated, go back to the login page and enter your username and password. Now you will see the home page of our Web Desk.
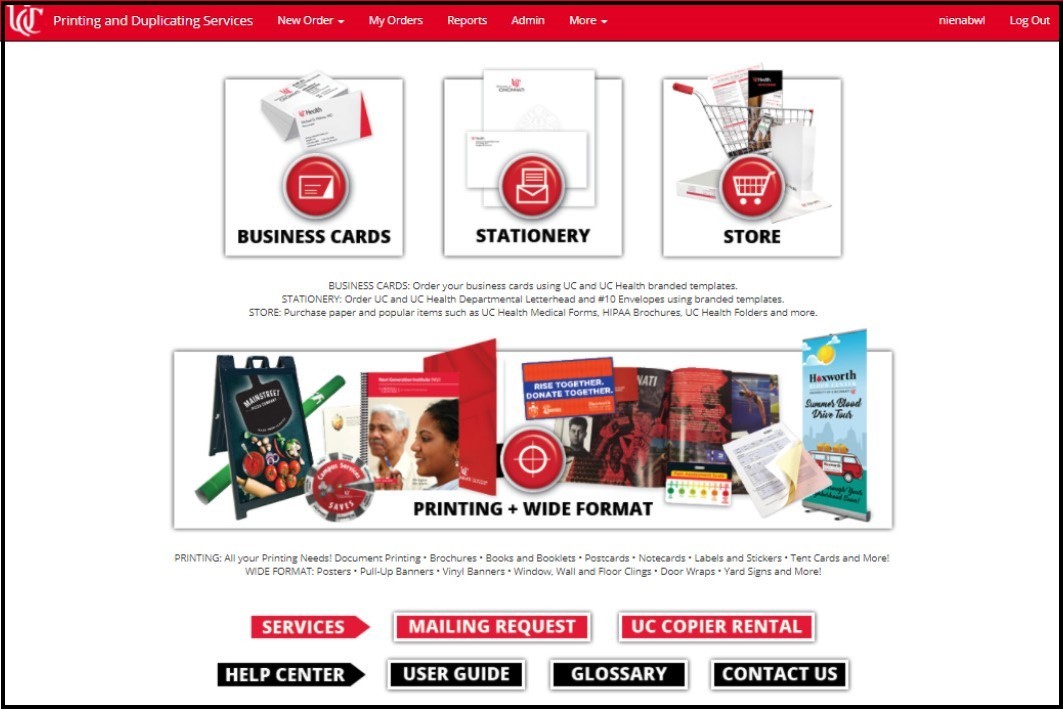
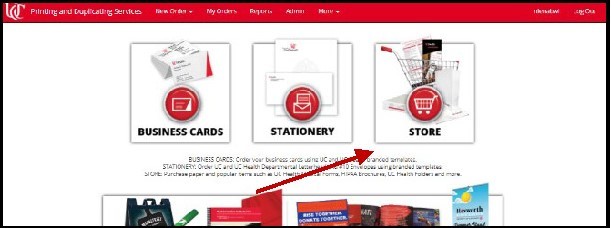
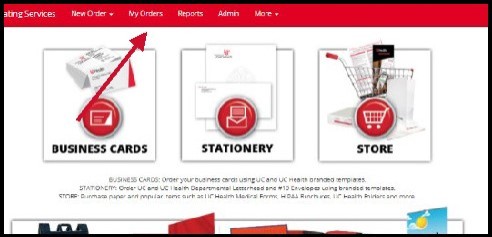
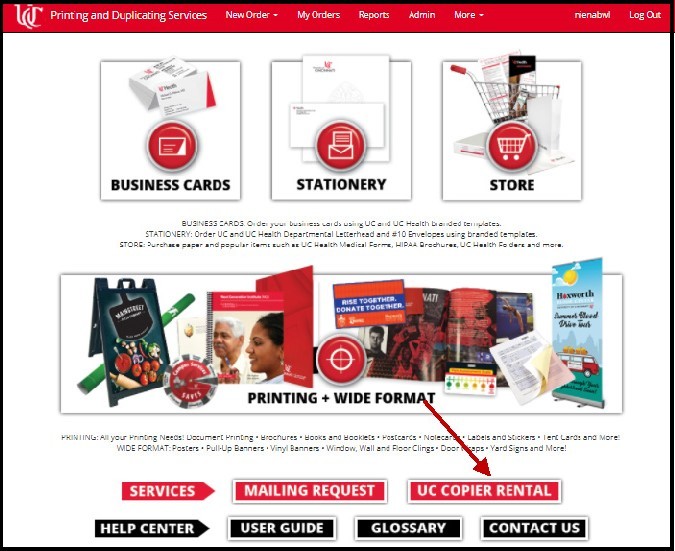
Business Cards
The Business Cards section contains templates for all UC and UC Health business and appointment cards. Included are cards for UC students and static UC Health cards for offices like Patient Financial Services and the Comprehensive Stroke Center. You will only see the cards relevant to your particular site (UC or UC Health).
Non-UC/UC Health customers should order using the Printing + Wide Format button.
Stationery
Order all your stationery, whether by using a template to enter your department’s information, or placing an order based on your letterhead or envelope designs that are already on file at Printing Services. You will only see the stationery relevant to your particular site (UC or UC Health).
Non-UC/UC Health customers should order using the Printing + Wide Format button.
Store
Our Store features an assortment of pre-printed and print on demand items, including various forms, pads, envelopes and letterhead (both UC and UC Health). In addition we offer products for Cincinnati Children’s Hospital and Cincinnati State customers.
Paper by the ream or by the case are available, as well.
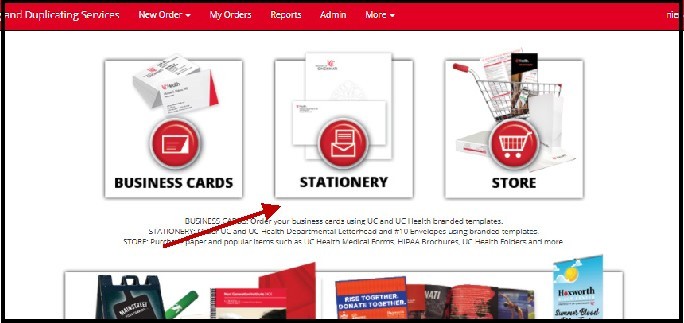
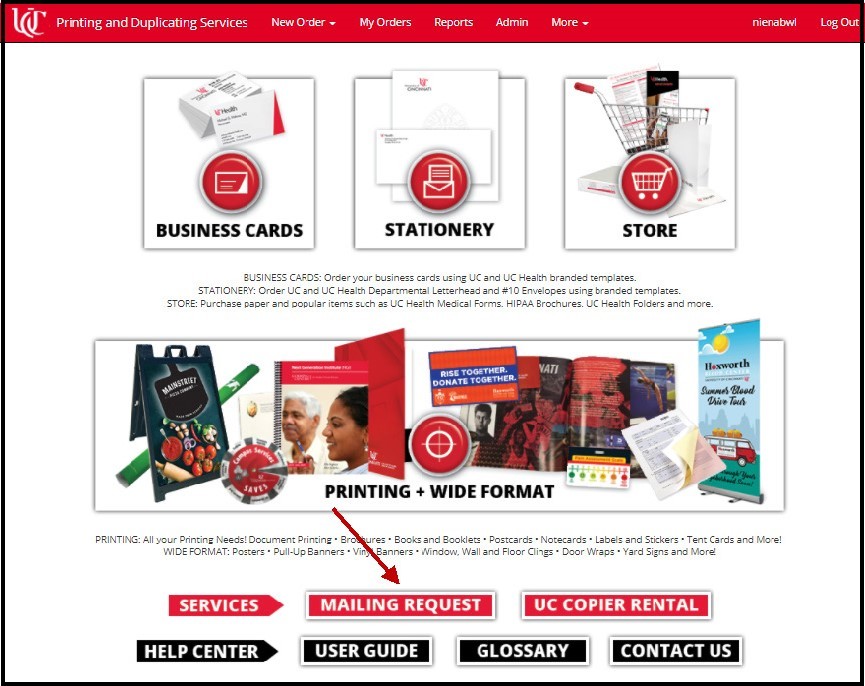
Printing + Wide Format
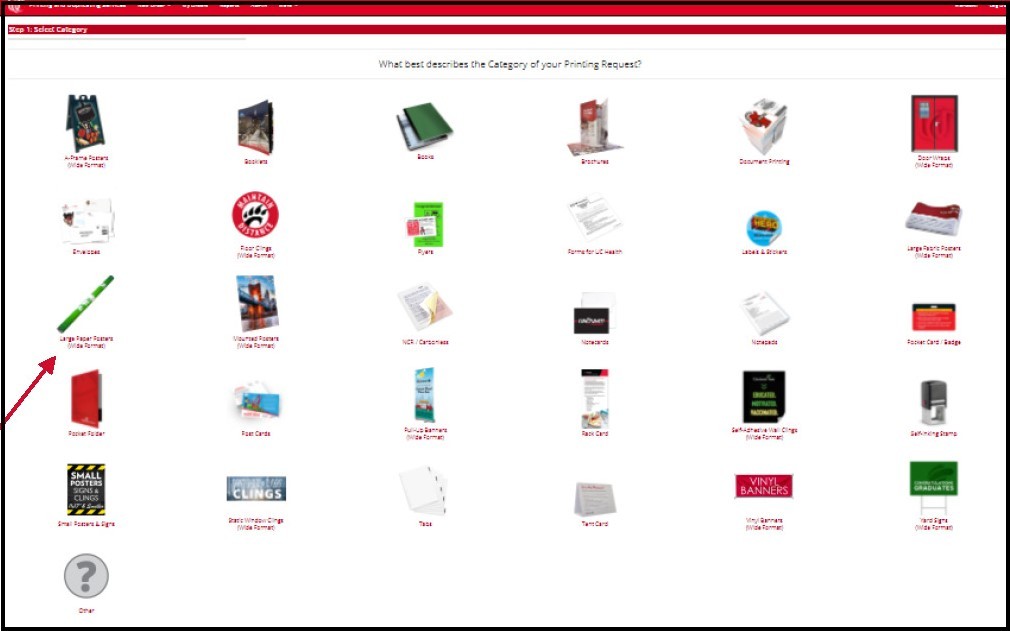
Use the Printing + Wide Format button to request to request any print job. This includes all our Wide Format products, as well as all our other print categories, including simple document prints, brochures, booklets, smaller posters (12” x 18” and smaller), note pads, post cards, and many other products.
Services, Mailing and Help Center
Beneath the order types is the Services section. It includes forms you can use to arrange for a bulk or first-class mailing, or to request a departmental copier/printer placement.
The Mailing area also features some helpful informational links to the USPS web site.
Our Help Center includes a copy of this User’s Guide, Glossary of Terms, and contact information to help you reach a member of our team.
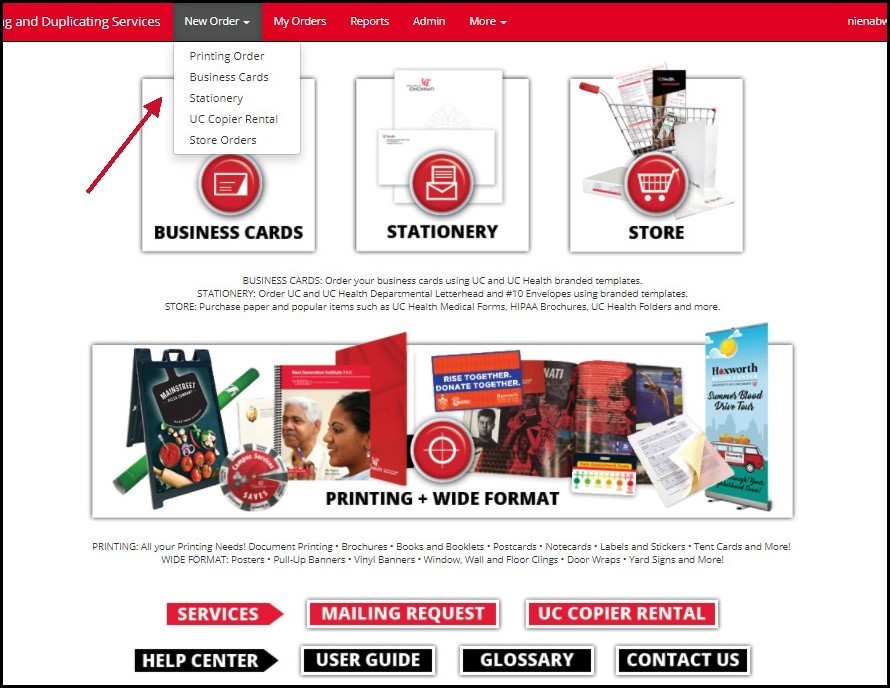
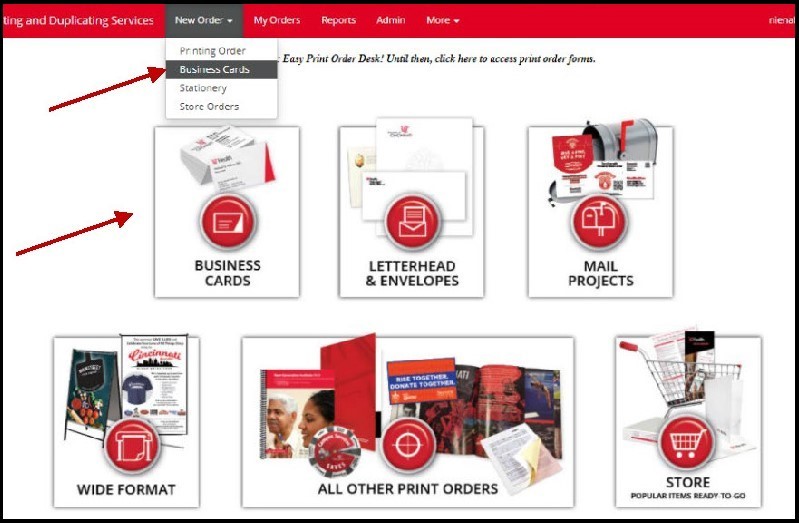
Before you begin your order, review the navigation. There are two ways to start the process.
- You can click the large button, or anywhere on the image, that corresponds to your order type.
- You can select the appropriate option from the New Order menu in the red header bar. Note that Printing and Wide Format categories are grouped together under the Printing Order option, as shown on the corresponding button. The UC Copier Rental option will take you to the form to submit a request for a departmental copier/printer.
Instructions in this guide will use buttons.
Placing a Print Order
Step 1
Choose a button based upon the type of print order you need to place.
For example, first, click the Printing + Wide Format button, which will take you to this category page. Note: categories are listed in alphabetical order as recommended by university accessibility standards.
Let’s say you want to have brochures printed. Find the icon for brochures (fourth from the left in the first row) and click that to open the order form. You will be directed to the page that displays the various options for brochures.

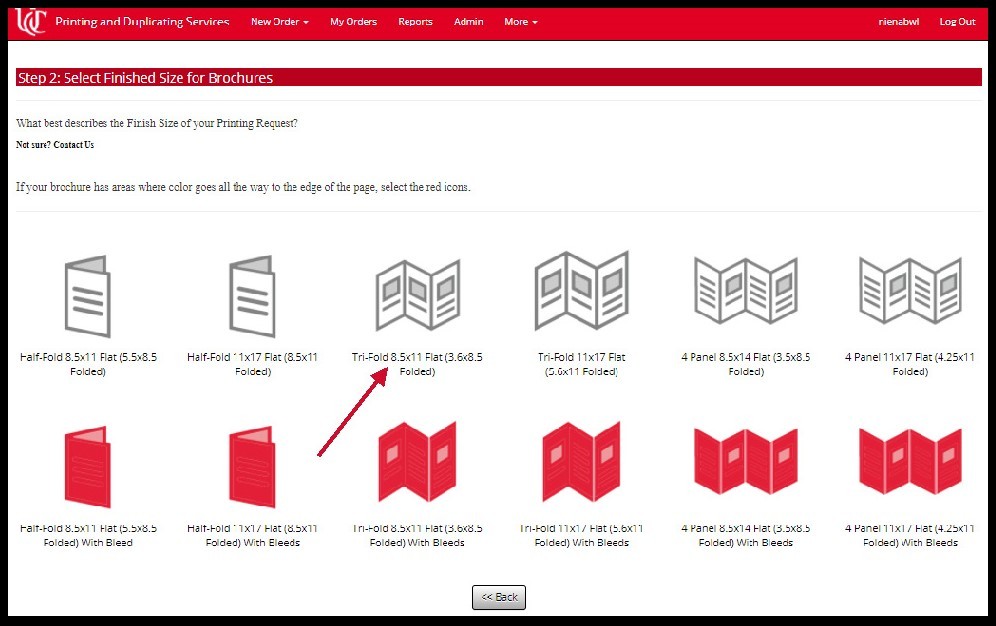
Step 2
Decide which size and folding options best describe your brochure. For this example, let’s use Tri-Fold 8.5x11 Flat (third from the left in the first row). This option is for brochures with no bleed, if your file includes a bleed (image all the way to the edge of the page) those options are the red icons in the second row.
Step 3
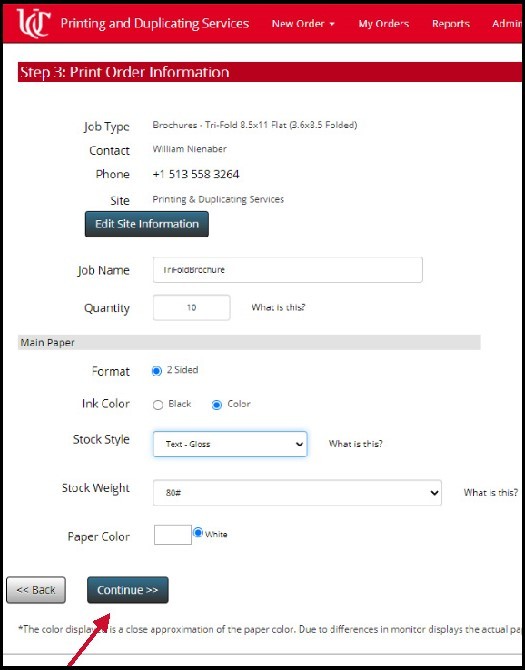
Give the order a name (something descriptive will make it easier to find the order in case you need to look it up later). Enter the quantity of brochures you want to order. Click the appropriate Ink Color to indicate whether the printing will be all black or color. Select the Stock Style and weight. You can use Bond, Text, or Cover (click What is this? for an explanation of these terms and the weights). If you are using Bond paper, select a color. Click Continue.
Step 4
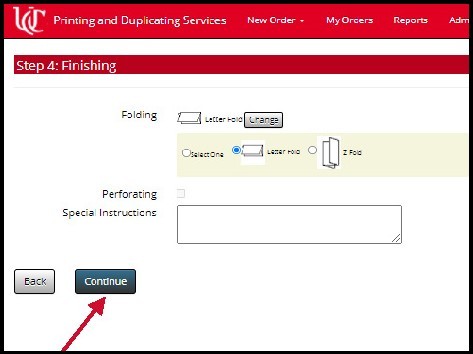
On the next page, you will select the type of fold you want, and whether perforation is needed. You may also add any special instructions if you like. Click Continue.
Step 5

The next page allows you to attach the file you need printed. Click Yes to display the attachment instructions. If you click No, you will be prompted at the end of the order to Print and send to the Print Shop along with the artwork.
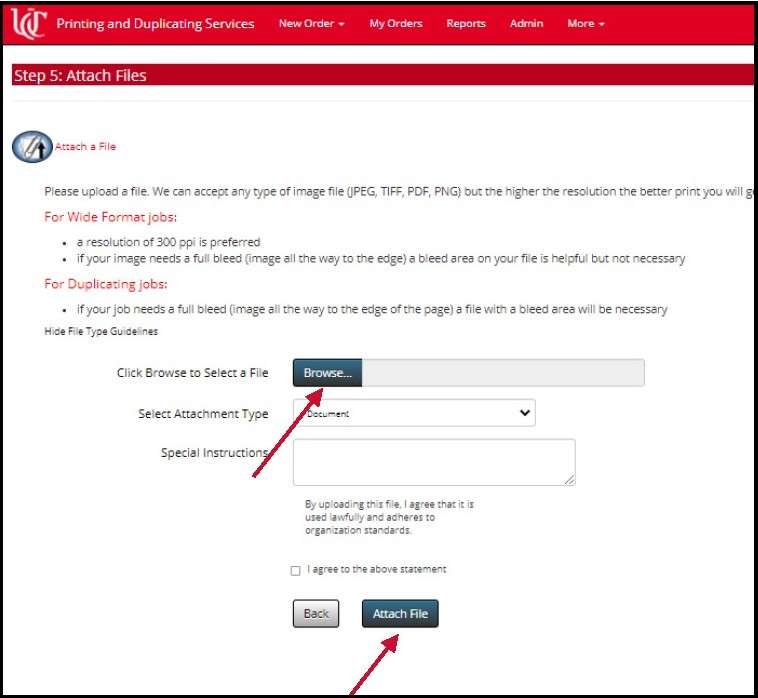
After taking note of the instructions, click Browse to locate your file. In most cases the attachment type can be left as Document. Once again, there is a space for including any special instructions that you think might be helpful. Before clicking Attach File, make sure you check the box stating that you agree to the disclaimer. When you click Attach File, a window will open displaying the file you’ve attached.
If all is well, click Close at the top and you will have the opportunity to attach more files if necessary.
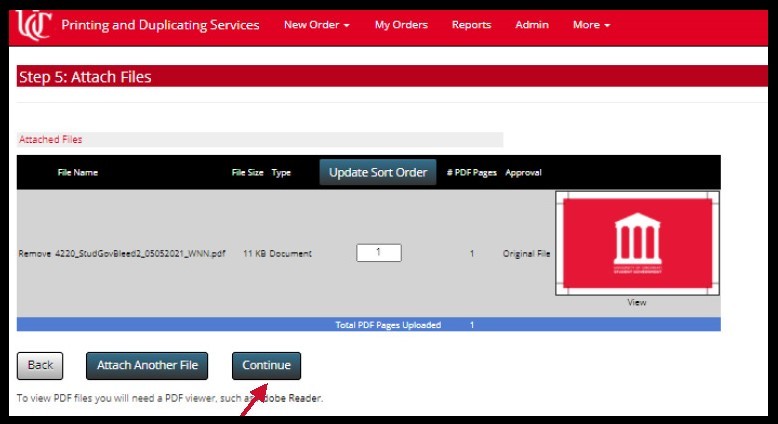
If you don’t need to attach any more files, click Continue to review your order and receive your initial estimate. As noted on this page, this is only an estimate based upon the options you selected during the order process. If our staff determines that any adjustments are needed, they will contact you with a new estimate.
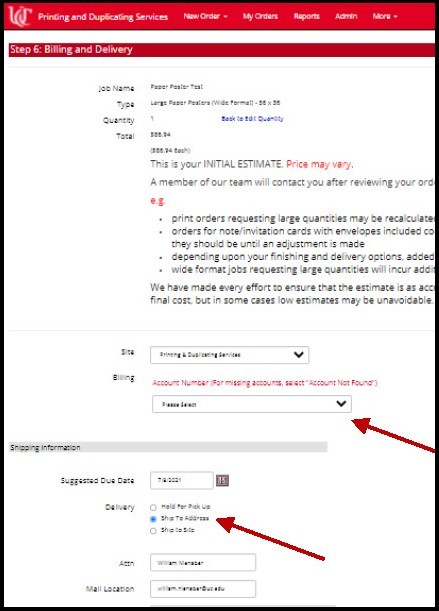
Step 6
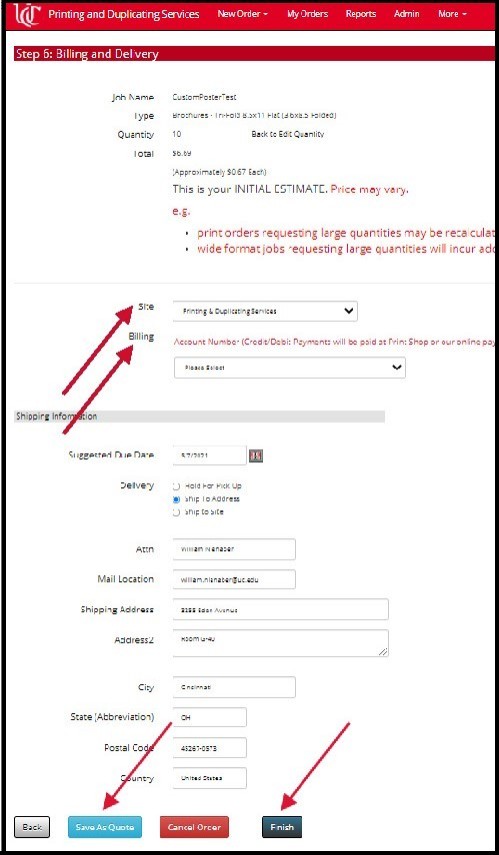
In the middle section, make sure your Site name is correct, then choose the account string you want to use from the drop-down Billing list. If you don’t find the account string you’re looking for, contact a member of our team so they can help make sure it has been added to your user profile.
You can then designate whether you want your work delivered to you, or if you’d prefer to pick it up yourself. For deliveries, please be sure all your address information is correct, and that someone will be there to accept the delivery. If you choose to pick up, you can select which of our locations would be most convenient for you.
Placing a Wide Format Order
Step 1
Select the Printing + Wide Format button from the Print Order Desk home page. You will be taken to the page with all the print order categories. Categories are listed in alphabetical order as recommended by university accessibility standards.
All Wide Format categories are marked as such on the second line of text. Find the icon for the category you need to order. For this example, let’s order a large paper poster, so click that icon. We’ll also request laminate for this as an extra learning opportunity.
Step 2
Click the icon that describes the size poster you need to order. For this example, let’s order a 56” x 36” poster, and when we reach the appropriate page we’ll add gloss laminate.

Step 3

Give the order a name and enter the quantity. You have the option to request rush service if your poster is needed quickly. Our standard turnaround for all Wide Format work is 3 business days, but you can request a turnaround as soon as 1 business day for a rush surcharge of 50%. If you don’t need to rush the job, just click Choose Printing Stock to expand the form.

Next, indicate whether your poster will be all black ink or color. This is the last choice for this page of the order form. Click Continue.
Step 4

On this page, you will choose finishing options for your poster. While it may seem confusing, this system lists laminating as a binding option. The default for posters is “none”, but for this example we’ll choose Laminating - Gloss. Click the Change button to display options,
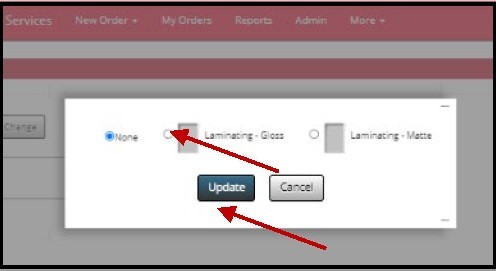
A pop-up window will display the laminating options. Let’s choose Gloss laminate for your poster; click that option, then click Update.
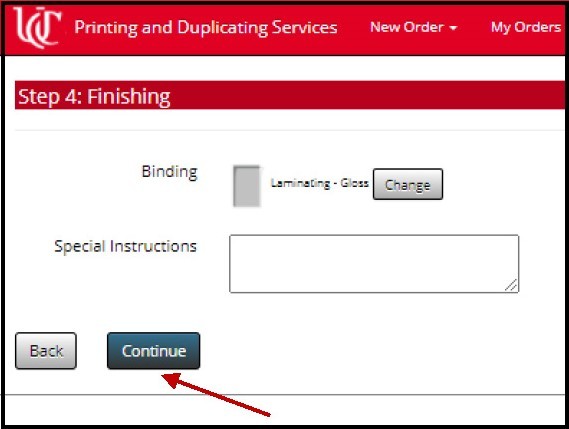
If necessary, you can add Special Instructions that may help us process your order, then click Continue.

Here is where you may attach your print-ready file. If you don’t have a digital file to attach, press No, Skip Attaching a File. In this case you will be asked if you are sure you don’t want to send a file, and later you will be prompted to print the order and send it to the print shop along with your artwork. To attach a digital file, press Yes.
Now you can browse to find your file and click Attach File to add it to your order. You can also enter any special instructions that may be needed. The Attachment Type will be the default Document, unless you are attaching a mailing list for a mail merge.
You must also click the box that says you agree to the disclaimer message.

Click Attach File, and your attachment will be displayed (I’ve just attached a blank UC branded poster template for the example). Click either the Close button at the top center, or the X button at the top right corner to close the window.

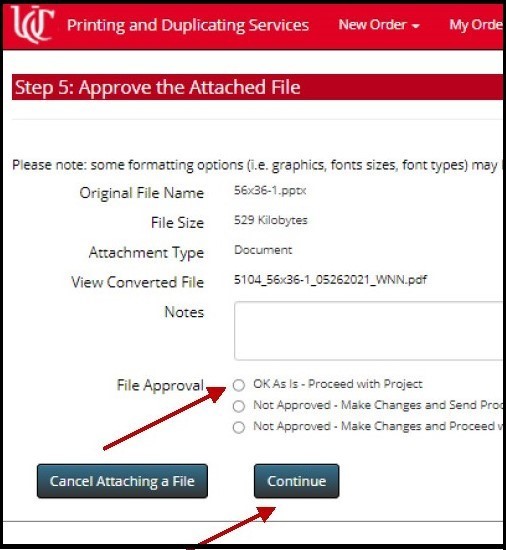
If everything looks good, click the OK As Is option, then click Continue.

You will have the opportunity to attach more files if necessary, but if you’re through with attachments, click Continue.
The last page is the confirmation page, which includes the order number, and a link to see the Order Summary. If you are working on a project that will include multiple orders, you can use the Add Another Print Order to this Project button to begin a project that will group all the orders together.
Placing a Business Card Order
These instructions are specific to UC/UC Health Customers. Non-UC/UC Health Customers should order using the instructions for Print Order.
Print Order Desk User Guide
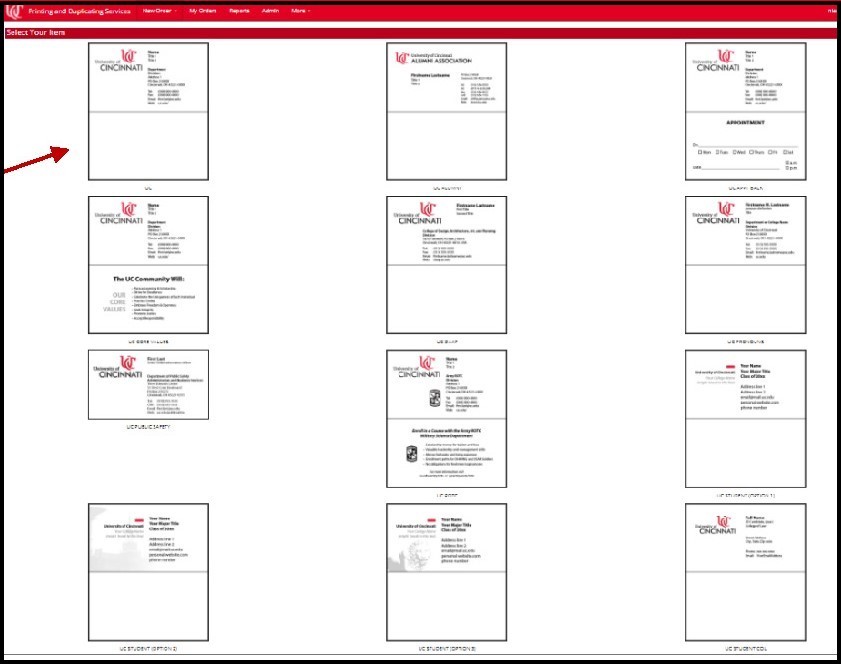
Select Business Cards from the Print Order Desk home page, or choose Business Cards from the New Order drop-down menu in the red header bar. You will be taken to the business card template page, where the options visible to you will depend upon the privileges assigned to your chosen site (UC or UC Health). We’ll order UC cards for this example.
Step 2
The standard UC business card is the first option, which most faculty and staff will use. Other options are available, including a card with an appointment backer for those who want the option to hand out appointment reminders, a card that allows the addition of the user’s preferred pronouns, and approved designs for business cards that can be ordered by students.
In our example, we’ll order the standard card, so click that icon.
Step 3
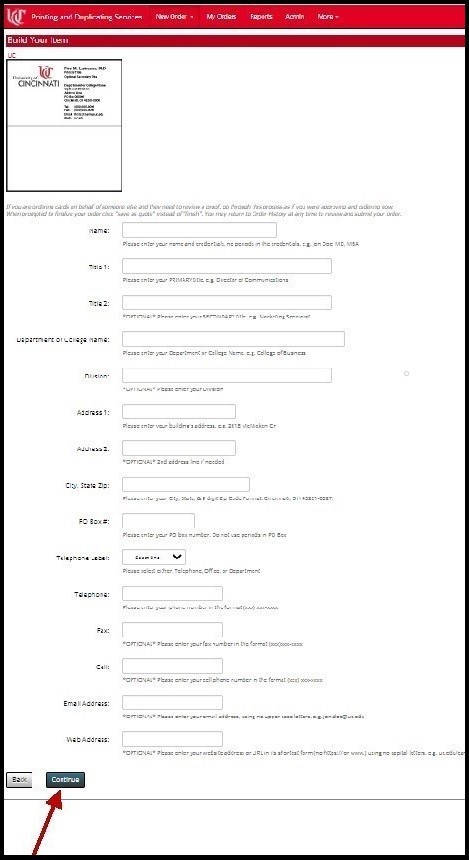
Note that some fields are designated as *OPTIONAL* (below the text entry box). All other fields must be filled in to proceed to the next step. When all fields are completed, click Continue.
Step 4
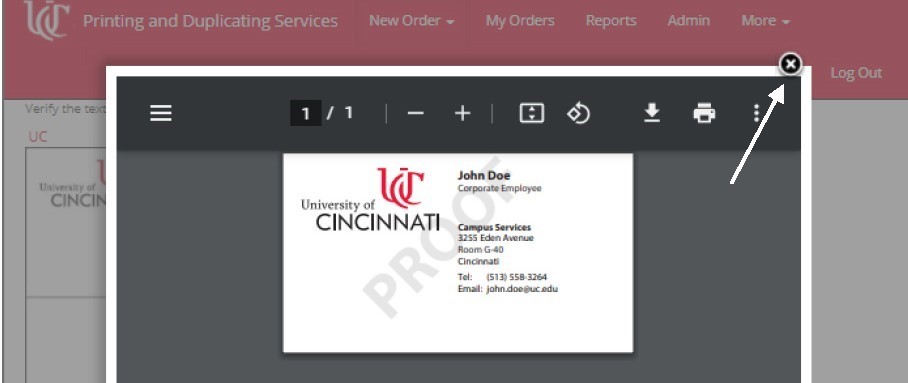
A pop-up window will open showing you a proof of the card information you’ve entered. If all is well, click the X at the upper right of the window.
Step 5
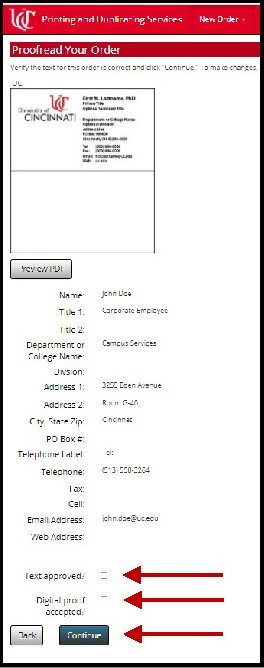
The window will close and you will be asked to approve the Text and the Digital proof. Check both boxes and click Continue.
Step 6
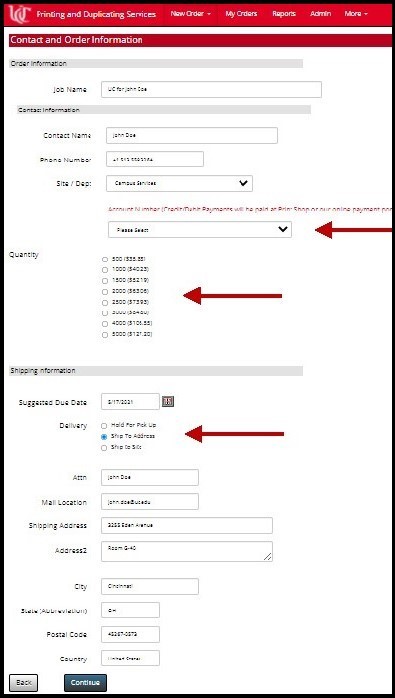
The system will automatically provide a default name for the order based on which type of business card you are ordering. You can change this if you wish. It will also autofill your name and contact information, which can also be edited.
Select the account number you’ll be using for payment from the drop-down list, and then select a quantity. You can request that your cards be delivered to you, or you can ask to have them held at our office for you to pick up. If you choose delivery, the location information is all editable. If you choose pickup, you can select which of our offices will be most convenient for you.
When you’ve completed all fields, click Continue.
Step 7
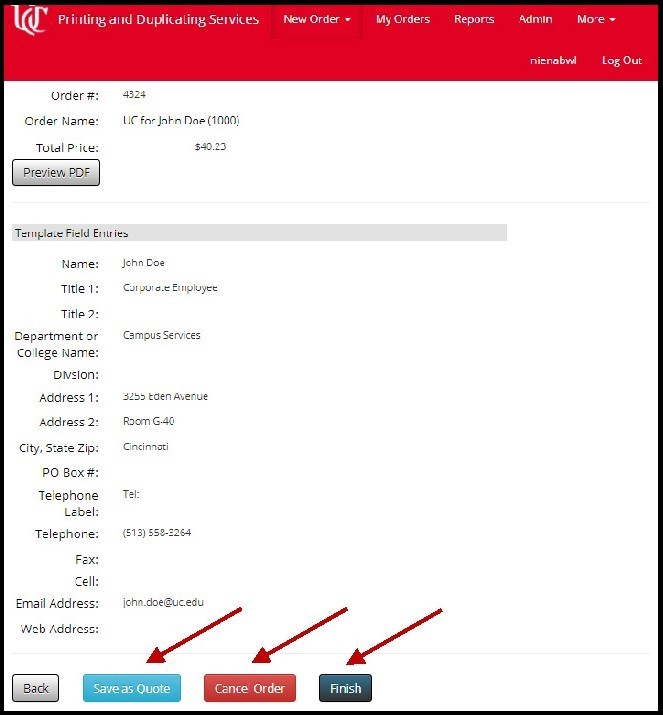
The next page is your order review page. You have one more opportunity to preview the PDF proof. In case you need to obtain authorization for the cost of the cards, or if you are ordering cards for someone else, you can choose to Save as Quote. This allows you to come back later to complete the order. You can also Cancel Order if there is a problem or you have changed your mind. If everything is good and you want to proceed with placing your order, click Finish.
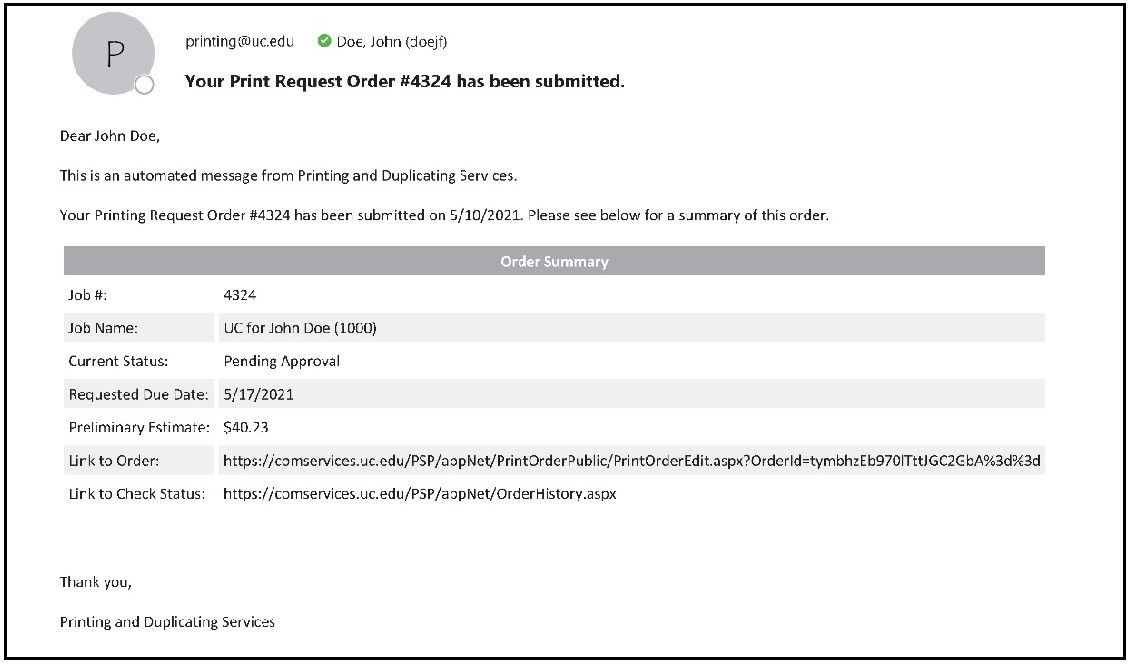
The last page is your order confirmation. You will also receive an email confirmation.
Placing a Stationery Order
These instructions are specific to UC/UC Health Customers. Non-UC/UC Health Customers should order using the instructions for Print Order.
Step 1
Select Stationery from the Print Order Desk home page. This will take you to the page that contains all letterhead and envelope options. The options you see will depend upon your site classification (UC or UC Health).
Step 2
Choose the item you need to order. For this example, we will order UC Academic letterhead. Choose that icon to proceed.

Step 3

Complete all the fields with your department’s information, then click Continue.
Step 4
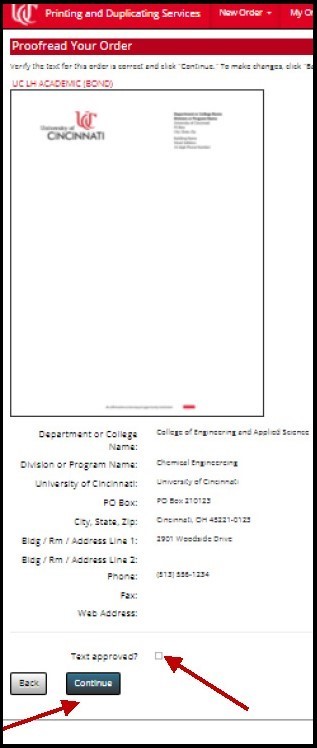
On the next page, please proofread all the information you input to ensure it’s accurate, then check the Text Approved box and click Continue again.
Step 5
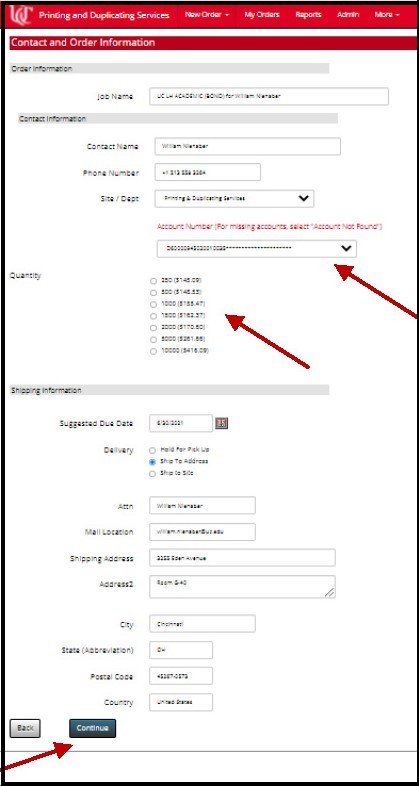
Next, select your account number from the drop-down list, choose a quantity, and click Continue again.
Step 6

The next page gives you the opportunity to review your order one last time. If everything appears to be correct, just click Finish.
The final screen is your order confirmation, which will include the order number assigned. There is also a link that will take you to the order details.
Placing a Store Order
Our Print Order Desk Store contains a variety of items that are either in-stock or ready to print on demand, as well as generic items such as reams and cases of paper in a variety of colors.
There are client-specific forms, stationery, and other options for UC, UC Health, Cincinnati Children’s Hospital Medical Center (CCHMC), and Cincinnati State (CS) clients. Permissions based upon your affiliation will determine which items you see.
Non-UC/UC Health, CCHMC or CS clients will have the option to purchase paper.
Step 1
Select Store from the Print Order Desk home page.
Step 2
The main page of the store displays a few items available for each client category, with a link on the right (circled in red) to show more products. In the grey menu bar on the left, you can select the specific category you want to shop from. Let’s have a closer look at the General Store category by clicking that choice from the menu.
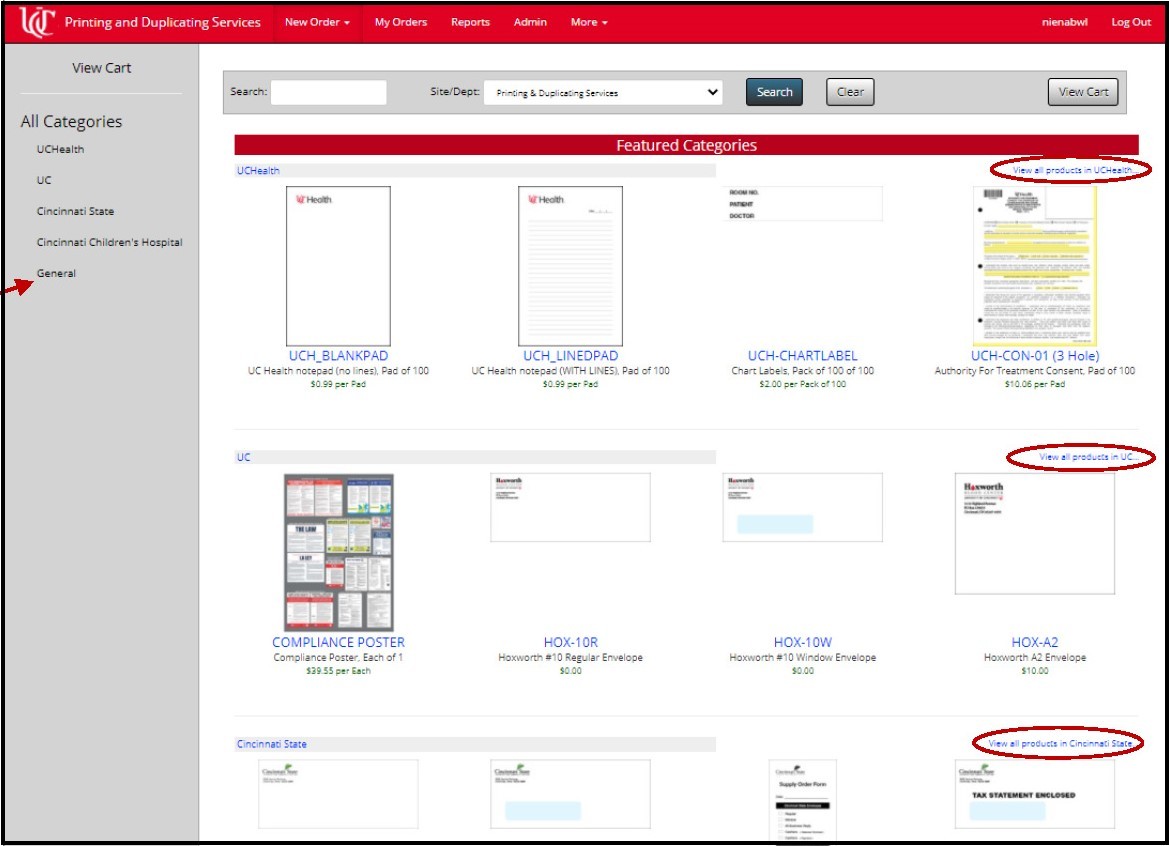
Step 3
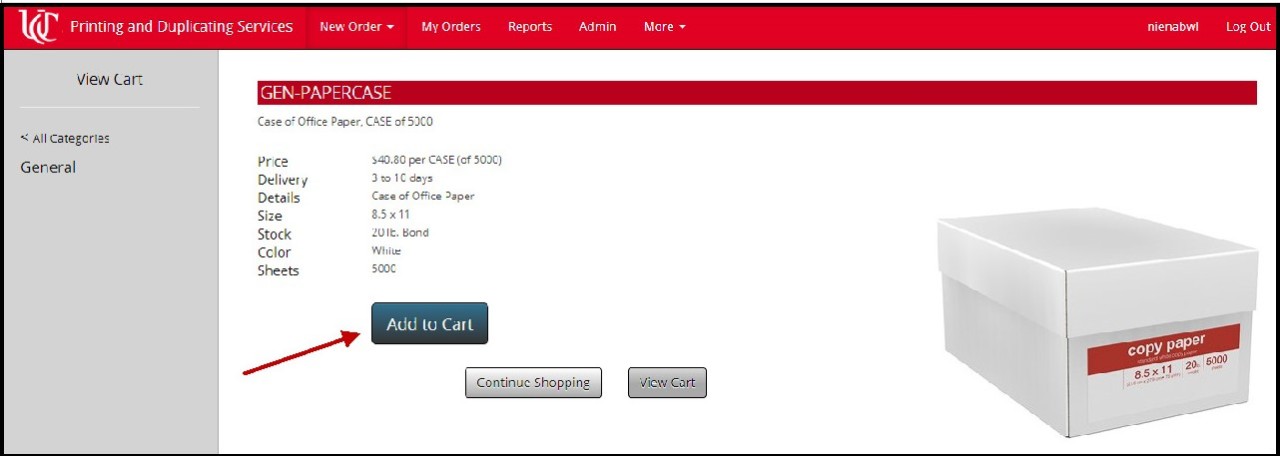
The General section of the Store features paper, which is available by the ream or by the case, and blank envelopes. Let’s say you need a case of paper for your departmental copier or printer. Click the icon representing a case of plain white office paper. That’s 10 reams total.

You will be taken to the order page for that item, with details such as price, size and type of paper, and an estimated time of delivery.
Step 4
Click Add to Cart to purchase.
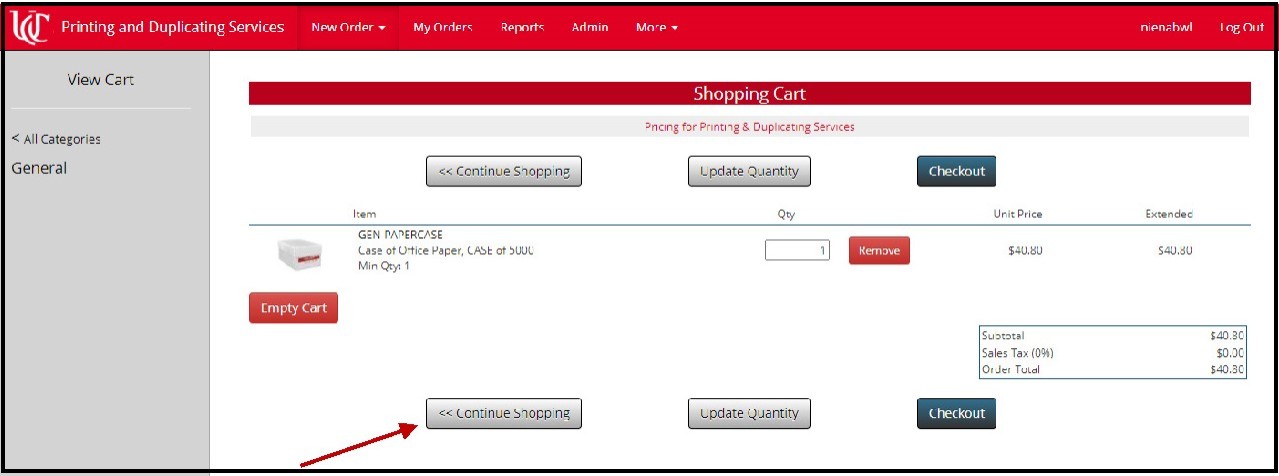
Your shopping cart will be displayed. If you need more than one case, you can edit the quantity, then click either of the Update Quantity buttons. If you change your mind, you can click Empty Cart.
You will see a running total of how much your order will cost. At this point, you can either Continue Shopping or proceed to Checkout. For this demonstration, let’s add a box of envelopes; click Continue Shopping.
Step 5
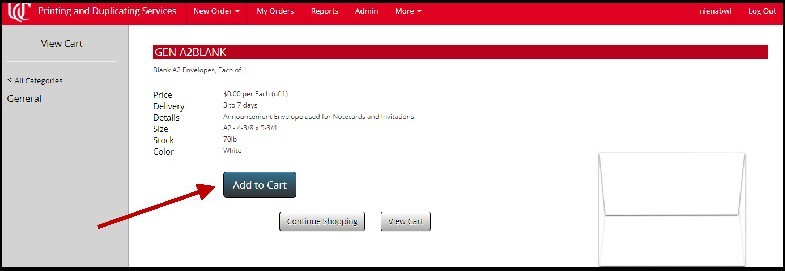
You will be returned to the General Store page. Scroll to the bottom of the page to find the available envelopes. Let’s add a box of the Blank A2 envelopes to our cart by clicking that icon.

Step 6
Once again, when you’ve checked the details and you’re sure these are the envelopes you want, click Add to Cart.
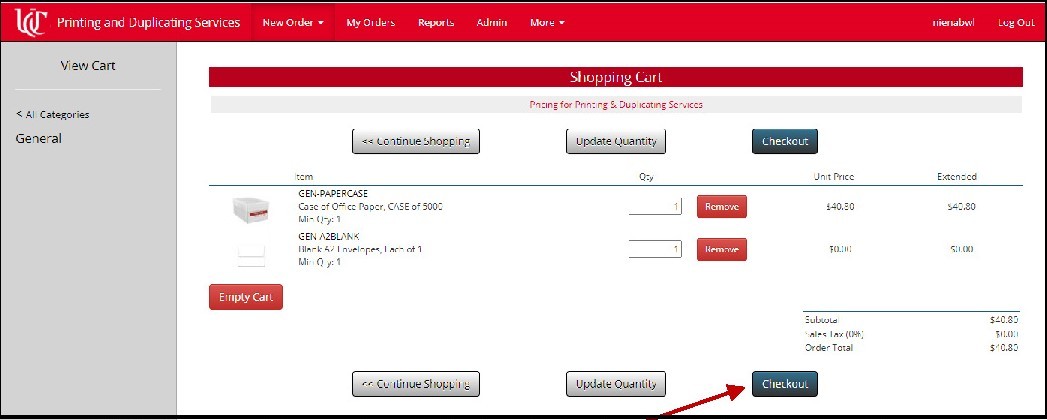
You will return to your shopping cart, where you will see the envelopes added below your case of paper. Once again, you have the option to change and Update the quantities of both items. If everything is good, click Checkout.
Step 7
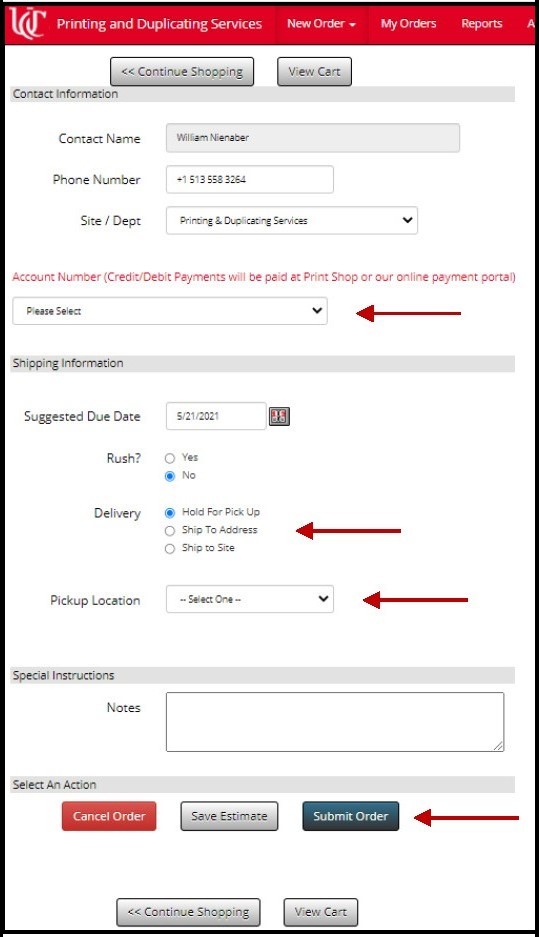
On the Checkout page, you can choose to Continue Shopping or go back to View Cart.
If you’re ready to complete your order, review the accuracy of your contact information , choose your Account Number from the drop-down list, and specify whether you want to have your order delivered or if you’ll pick up. For delivery, double check the location is accurate, and if not, please correct it.
If you choose to pick up you can specify which of our locations you prefer. You can Save Estimate if you need to obtain approval for the purchase, then come back later to finalize the order. If that’s not the case, click Submit Order.

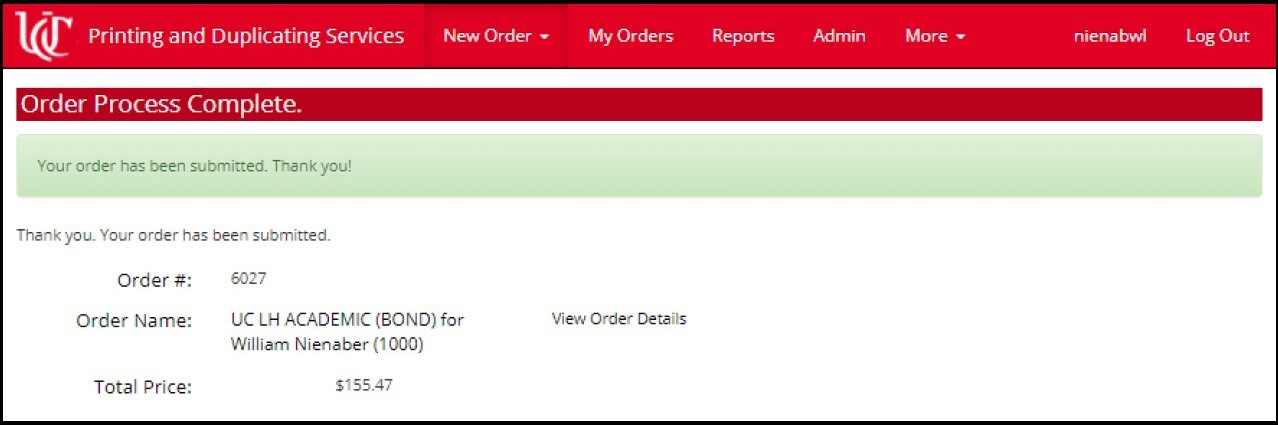
You will receive a confirmation that your order has been submitted, with a ticket number for your reference.

You will also receive an email confirmation.
Paying with Credit Card/ACH
If you have placed an order using the Credit Card/ACH account option, your order will need to be paid before it is delivered or picked up.
If you’re picking your work up personally at one of our locations, you will be able to pay at the counter. If you have chosen the delivery option, or if you would prefer to pick up with limited contact, you can pay via our online uStore portal. If you chose delivery, you should receive an email informing you that your work is ready, with a link to the uStore so you can submit payment. If you don’t have an email with the link, use the button below.
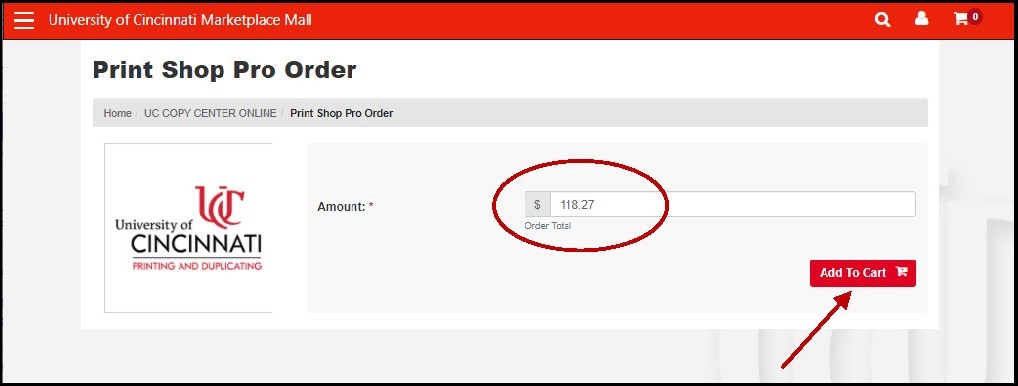
When you reach the mail page of our uStore, enter the amount on your order into the Order Total field, then click Add To Cart.

Click the image mentioned in the CAPTCHA text and click Continue.

On the next page, click Checkout.
Next, enter the required information (all 3 fields are required). In the bottom field (Job/Invoice #:), please enter the order number found on the order you’re paying for. Then click Continue.

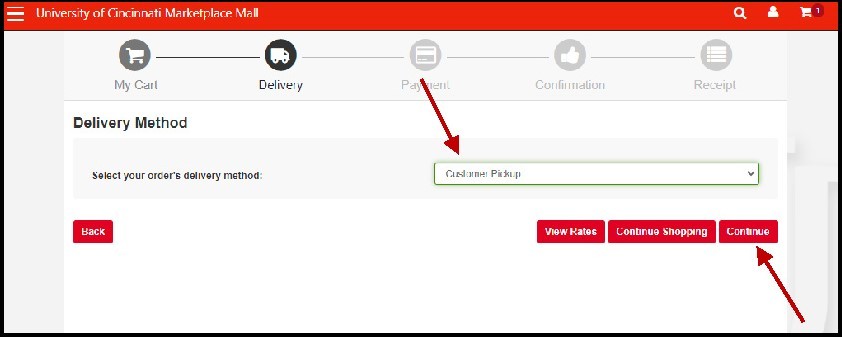
For Delivery Method, please select Customer Pickup, then click Continue. If your order is scheduled for delivery, it will still be delivered.
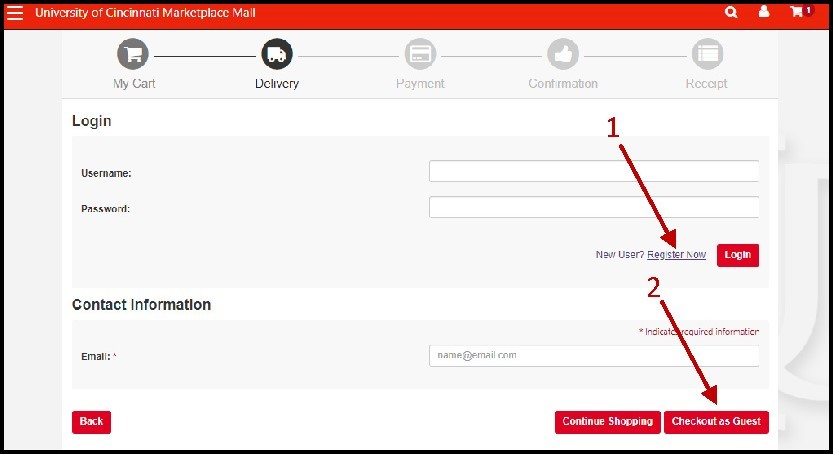
If you are a Credit Card/ACH client, it would be a good idea to register an account for a quicker process on future payments. To do this, just enter a username and password, then click Register Now (1).
Otherwise, you can Checkout as Guest (2).
Using the drop-down at the top, select Credit Card or Electronic Check (ACH) as your payment method. For ACH, you will need to know your bank’s routing number and your account number.

Fill in your credit card or ACH information, and all the Billing Address information, then click Continue. All fields under Billing Address are required, except Address Line 2.


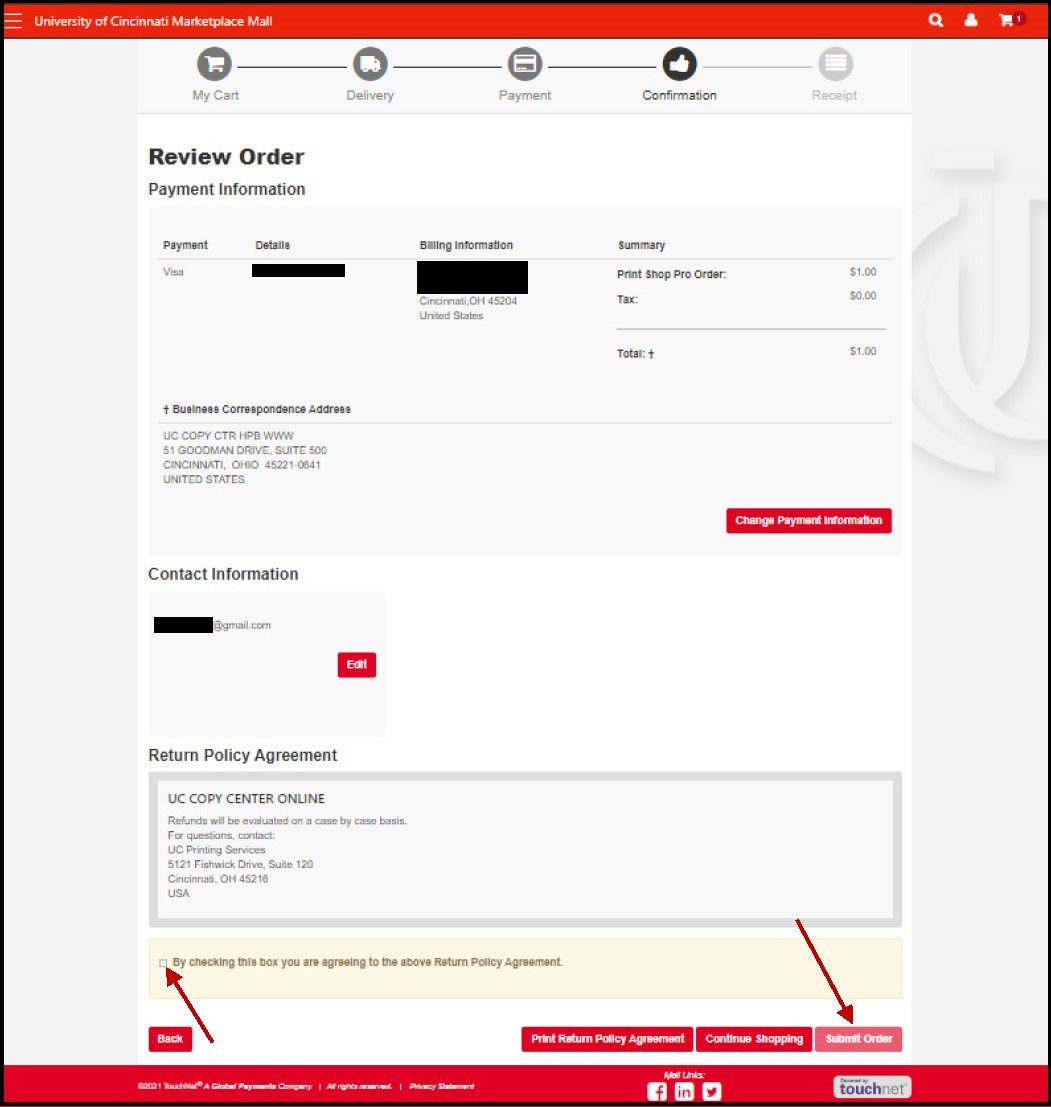
Finally, ensure that all your billing information and your payment amount are correct, then check the box that indicates your agreement with the return policy and click Submit Order.
Working with Your Orders
All orders you submit through the Print Order Desk will be saved for you to review or resubmit. This makes it simple for you to find your expenditures in case there is a question about them later, and to submit recurring jobs without going through the entire order process.
To see your archived orders, click My Orders in the red bar on the home page.
You will be taken to the list of all your previously submitted orders. In the last column of each row in the list you will find a View link which will display the details of that order.
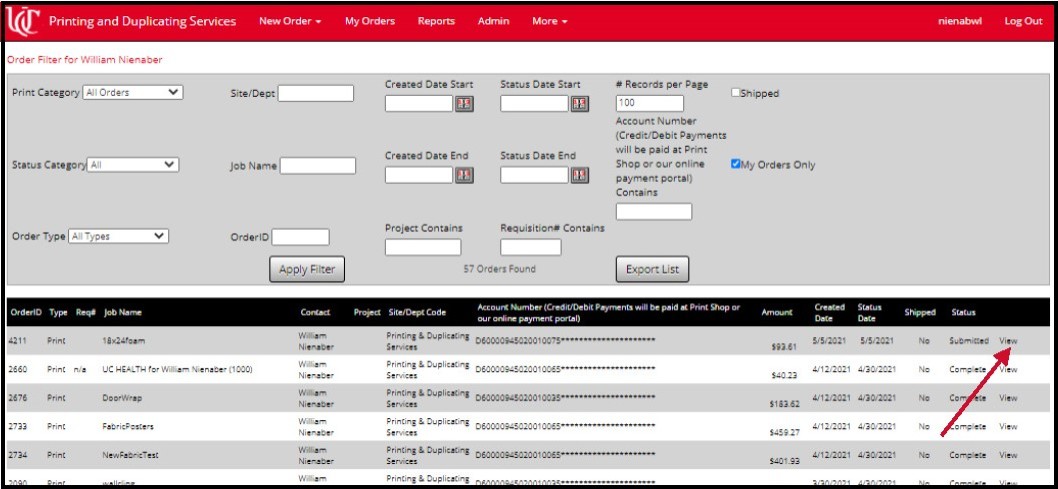

Here you have the option to Print Ticket, or to Copy Order if you need to resubmit a similar order. The order will open with a new order number.
In the copied order, you will be able to edit details that should be different from the original order. You can change the account number for billing and the quantity, and you can also add a new paper stock and attach a new file. Finishing options can be changed using the Change button in the Binding section, and you can also change the Hold for Pickup or Ship to options. When all edits have been made, Save it as a new order. There is also a Cancel option.
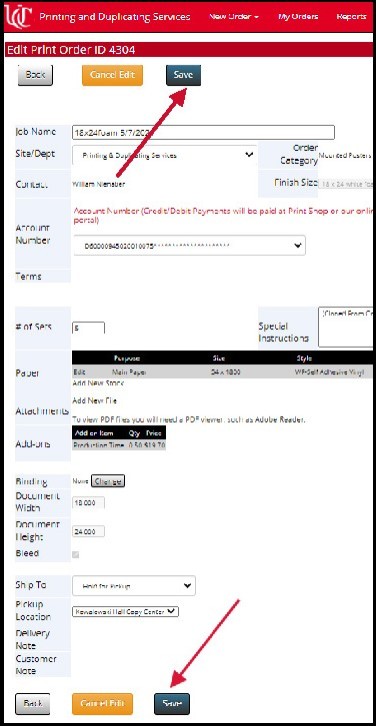
In the copied order, you will be able to edit details that should be different from the original order. You can change the account number for billing and the quantity, and you can also add a new paper stock and attach a new file. Finishing options can be changed using the Change button in the Binding section, and you can also change the Hold for Pickup or Ship to options. When all edits have been made, Save it as a new order. There is also a Cancel option.
Mail Services
Our Fishwick location offers both bulk and first-class mailing for your print projects. To take advantage of our mail service, click Mailing Request located in the Services section of our Print Order Desk home page.
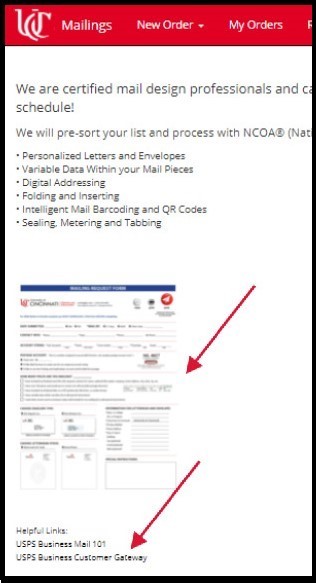
This will give you access to a form you can use to send us needed information regarding your mail project. There are also links to some helpful information from the US Postal Service. Click the image of the form to open it.
First, download the PDF form. Click the download icon in the upper right-hand corner.

Open the file using Adobe Acrobat or Acrobat Reader. Once you have completed all the information about your mailing, resave the file. Then, when you place your print order, please attach this file to the order as well as your print file. As soon as our staff has calculated the cost of postage for the mailing they will add it to your order, and you will receive a quote for the entire job (both print and postage costs).
We understand that clients sometimes need to charge postage costs to a different account number from the printing costs, and if this is the case, simply let us know in the Special Instructions field of your order. You can put the alternate account there and we will separate the charges for you.
Copier/Printer Rentals
We also offer copiers and printers for your office as rentals. To request information, click UC Copier Rental in the Services area of our Print Order Desk home page.
You will be taken to our form designed to collect all the relevant information we’ll need about your copier or printer needs. Click the image of the form to open the fillable fields.
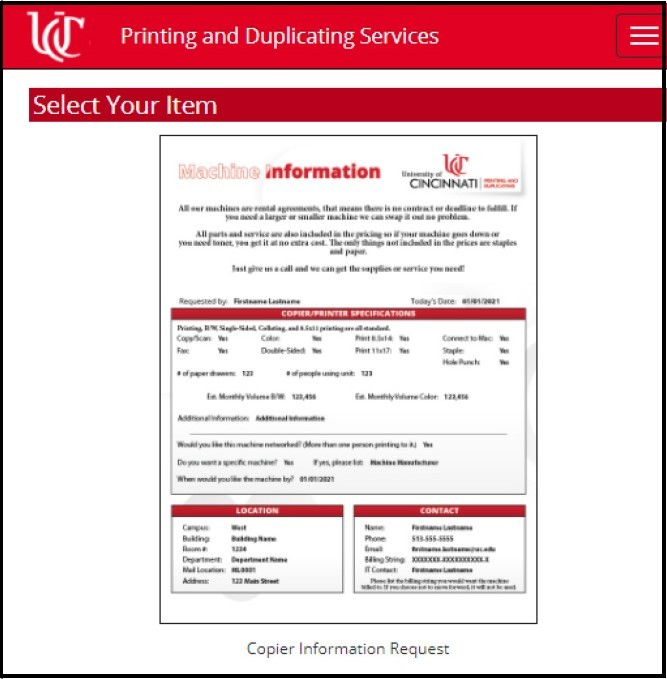
You will be taken to our form designed to collect all the relevant information we’ll need about your copier or printer needs. Click the image of the form to open the fillable fields.
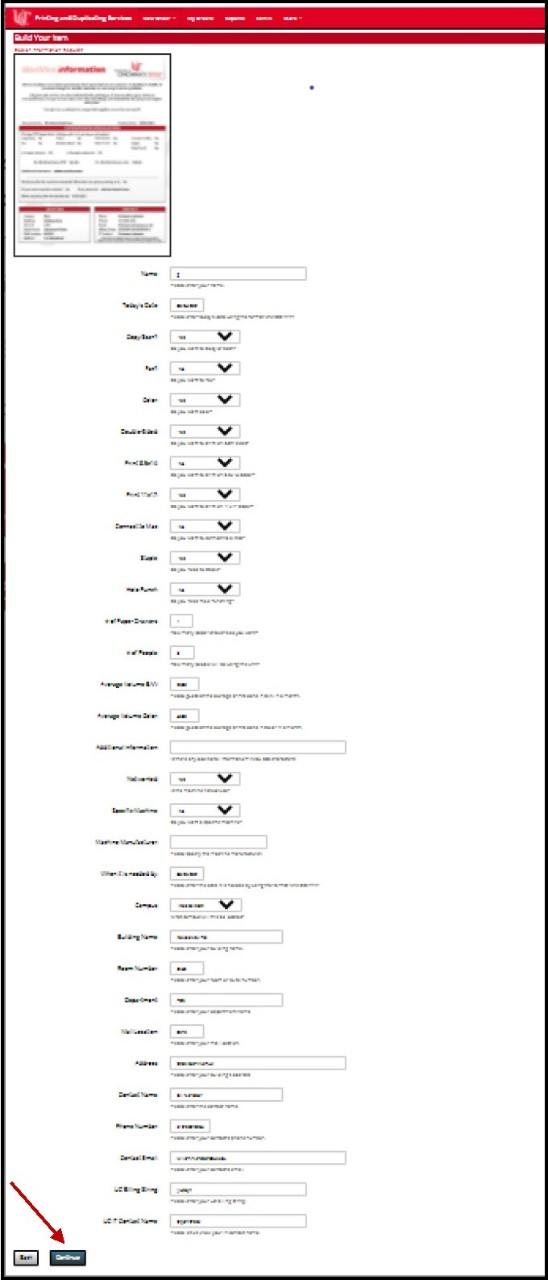
All fields are required, (with the exception of Additional Information, Machine Manufacturer, and UC IT Contact Name) so make sure you fill the form in completely. If you have questions, contact a member of our team for help. If you are interested in a specific manufacturer, there is a field where you can enter the name. When you have completed the form, click Continue.
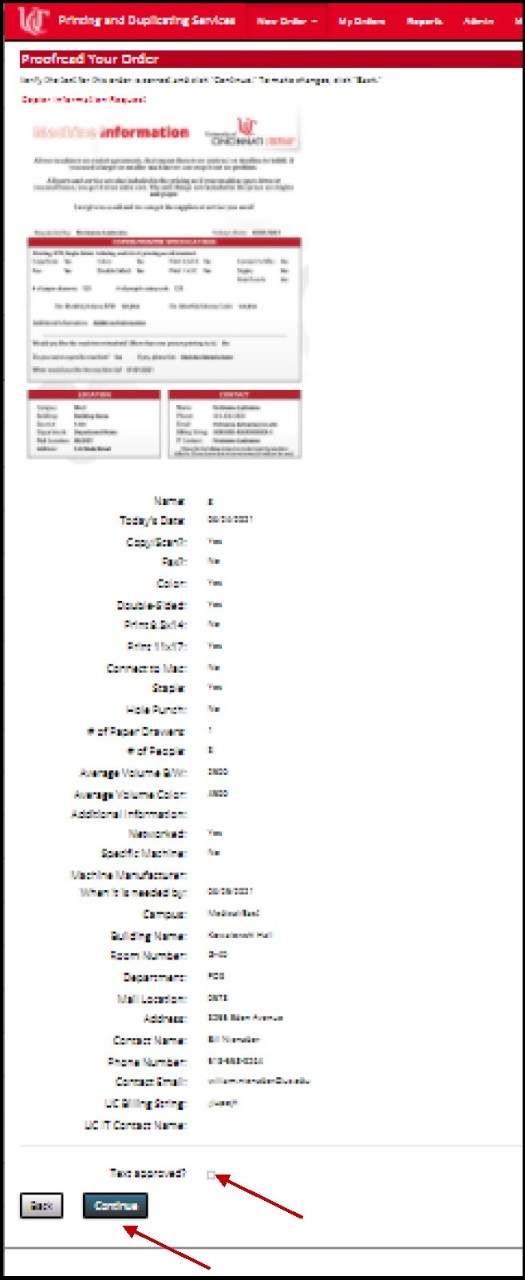
This will display the information you entered. Make sure that everything is accurate, then check the Text Approved box and click Continue.

Next, you'll enter your account number and quantity. One (1) is the only available quantity, so check the circle next to the quantity. Please select the account that the rental charges should be billed to. Nothing will be charged until after the bidding process is complete and you have approved the device we will recommend for you. Click Continue after you’ve selected your account number.
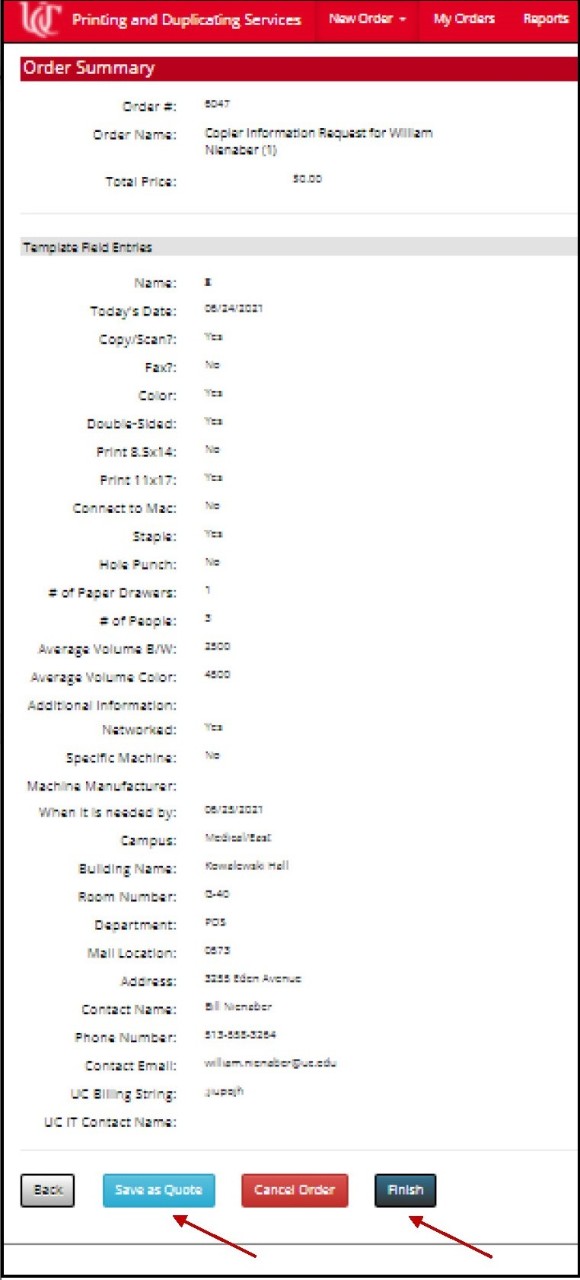
Your order summary will be displayed. You can click either Save as Quote or Finish to complete the submission.
Your final page will be your order confirmation, informing you that your form has been submitted. When our fleet copier coordinator receives the form, he will contact our vendors with an invitation to bid on the placement. The bids will then be evaluated based upon which one meets your needs most completely, as well as the amount of the bid. As a general rule, we like to give manufacturers a week to submit their bids, but if you need the unit sooner we will do our best to work with your needs.
Charges for fleet copiers are calculated monthly based on a per-copy “click” charge. Your contract will include toner replacements and service calls. Paper and staples will be billable on an as-needed basis.